Monday 30 January 2017

Happy birthday, Eileen

My mum recently asked me to make a birthday card for one of her very best friends, Eileen, who is turning 80. This is what I came up with:

I used the Concord & 9th "Hello Lovely" stamp set, and I gold embossed it onto some watercolour cardstock. I added some colour with some pink and green Distress markers, and then sprayed a heap of water over it. I added my sentiment from Hero Arts "Birthday Sayings" onto some vellum (gold heat embossed as well). I mounted the panel onto a pale pink Hero Arts note card, added some faux stitching with a Gelly Roll pen, and then added a few sequins from Pretty Pink Posh.

Thanks for visiting :)

Saturday 28 January 2017

Birthday bouquet

I'm still on my kick to increase my stash of birthday cards.  Yesterday, my two eldest nieces came to visit, so we got out some floral stamps and my Zig markers and got busy watercolouring.


 I'll be sharing this card at Happy Little Stampers: Watercolour - anything goes and at Simon Says Stamp for their "Anything Goes" week.
http://www.happylittlestampers.com/2017/01/hls-january-watercolour-challenge.htmlhttp://www.simonsaysstampblog.com/wednesdaychallenge/simon-says-anything-goes-35/

Thanks for visiting :)

Thursday 26 January 2017

Happy birthday, Maddi

I made this card for a young friend of mine who turns 21 this week - happy birthday, Maddi!
Just in case you were wondering, Maddi likes a bit of glitter, and is not averse to the colour pink. (Could you tell?)
I'll be sharing this card at Simon Says Stamp Wednesday challenge - Anything goes 
http://www.simonsaysstampblog.com/wednesdaychallenge/simon-says-anything-goes-35/
Thanks for visiting :)

Tuesday 24 January 2017

Birthday wishes

I discovered the other day that my stash of birthday cards is frighteningly low, so I immediately set about fixing that!
I used my new Zig markers and an Aquash brush to colour this image from Wplus9.  I then added a sentiment - die cut from Simon Says Stamp, stamp from Hero Arts.
 Thanks for visiting :)

Sunday 22 January 2017

MFT sketch challenge

Today, I'm joining in with the Wednesday sketch challenge at My Favorite things.

I coloured the girl from "Overflowing Joy" with Copics (RVs, BGs and Vs, with some Es for her hair and skin). The background is stenciled with the Lace stencil from Tim Holtz in Distress Inks - Spun Sugar on the card front, and in Cracked Pistachio on the inside (the card front is about 1.5cm narrower than the back, so a strip of the inside of the card shows through - it means that the girl's presents are hanging off the edge). The sentiment is from Wplus9 Strictly Sentiments.
http://www.cardchallenges.com/2017/01/wednesday-sketch-challenge-sketch-316.html
Thanks for visiting :)

Saturday 21 January 2017

Foiling a stamped image: Addicted to CAS

Hello! I'm excited today because I have been invited to be a guest designer at Addicted to CAS - the theme this week is "Wish". I also have a fun technique to share with you!
I started by making an ink pad using Ranger Cut and Dry, and inked it up with Heidi Swapp Minc Reactive Paint. I then used the "Make a wish" stamp set from Create a Smile, and inked up the word "wish" with my home made ink pad. I waited for the paint to dry, then ran it through my Minc Mini machine with some blue reactive foil. It worked a charm!
I then took out the "Lots of Stars" stencil from Create a Smile, and used some Caribbean Sky and Persian Blue inks from Altenew to blend ink over the card. Then, leaving the first stencil in place, I put the Winnie and Walter "Big Bang Sci-Fi Star" Creative Screenings stencil over the top, and inked in some of those little stars over the top. I then added in some more little stars with my Wink of Stella clear shimmer pen.  I added the "upon a star" bit of the sentiment with Sapphire ink, and then I added some Sparkling Clear Sequins from Pretty Pink Posh.


Thanks for visiting :)

Friday 20 January 2017

Celebrate your day

Hello! Today, I'm playing along with a few different challenges with this pink card.

I started by stamping the Hero Arts Flower Dot Pattern stamp in Versamark onto some Canson Montval watercolour paper, and white embossing the image. I then took three pink Zig markers and swiped the dark one once on an angle, the middle one twice (on either side of the dark) and the pale pink one twice (on either side of the middle pink). I then sprayed the panel with plenty of water to let the colours bleed and blend.  I then dried the panel and cut it across the darkest part on an angle.
I took the "celebrate" and "your day" stamps from Avery Elle's Sentimental stamp set and, with my MISTI, stamped them on the same angle that I had cut my panel. I then used foam tape to mount the two angled panels to the front (after cutting the top and bottom edges down a bit), and added a scattering of Pretty Pink Posh sequins.  Done!
 I'll be sharing this card at The Paper Players (black, white and one colour), at CAS on Sunday (also black, white and one colour), at CASology, whose theme is "Cut" and at Happy Little Stampers: Watercolour - anything goes
http://thepaperplayers.blogspot.com.au/2017/01/pp327-color-challenge-from-sandy.htmlhttp://casology.blogspot.com.au/2017/01/week-232-cut.htmlhttp://www.happylittlestampers.com/2017/01/hls-january-watercolour-challenge.html

Thanks for visiting :)

Thursday 19 January 2017

Fusion - Golden wattle

Welcome to a new challenge at Fusion! For today's challenge, we're going green and gold! I took the colours of the inspiration photo and interpreted the sketch to make this fusion.

I used the Beautiful Bouquet: Dahlia set from Wplus9, teamed with a sentiment from Avery Elle "Oh Happy Day". I white embossed the bouquet on some watercolor cardstock, and then coloured the flowers and leaves with various yellow and green Distress Markers, and then sprayed with lots of water, then dried with a heat gun (this is one of my favourite techniques). I repeated these steps until I was happy with the depth and variation of colour.  (I added a tiny bit of pale blue as a shadow.) I then mounted the panel on a pale yellow notecard from Hero Arts.

Thanks for visiting :)

Tuesday 17 January 2017

Two Valentine's Day cards for the price of one

Hello! Today, I am sharing a Valentine's Day card I made recently, and its sister card for a wedding.
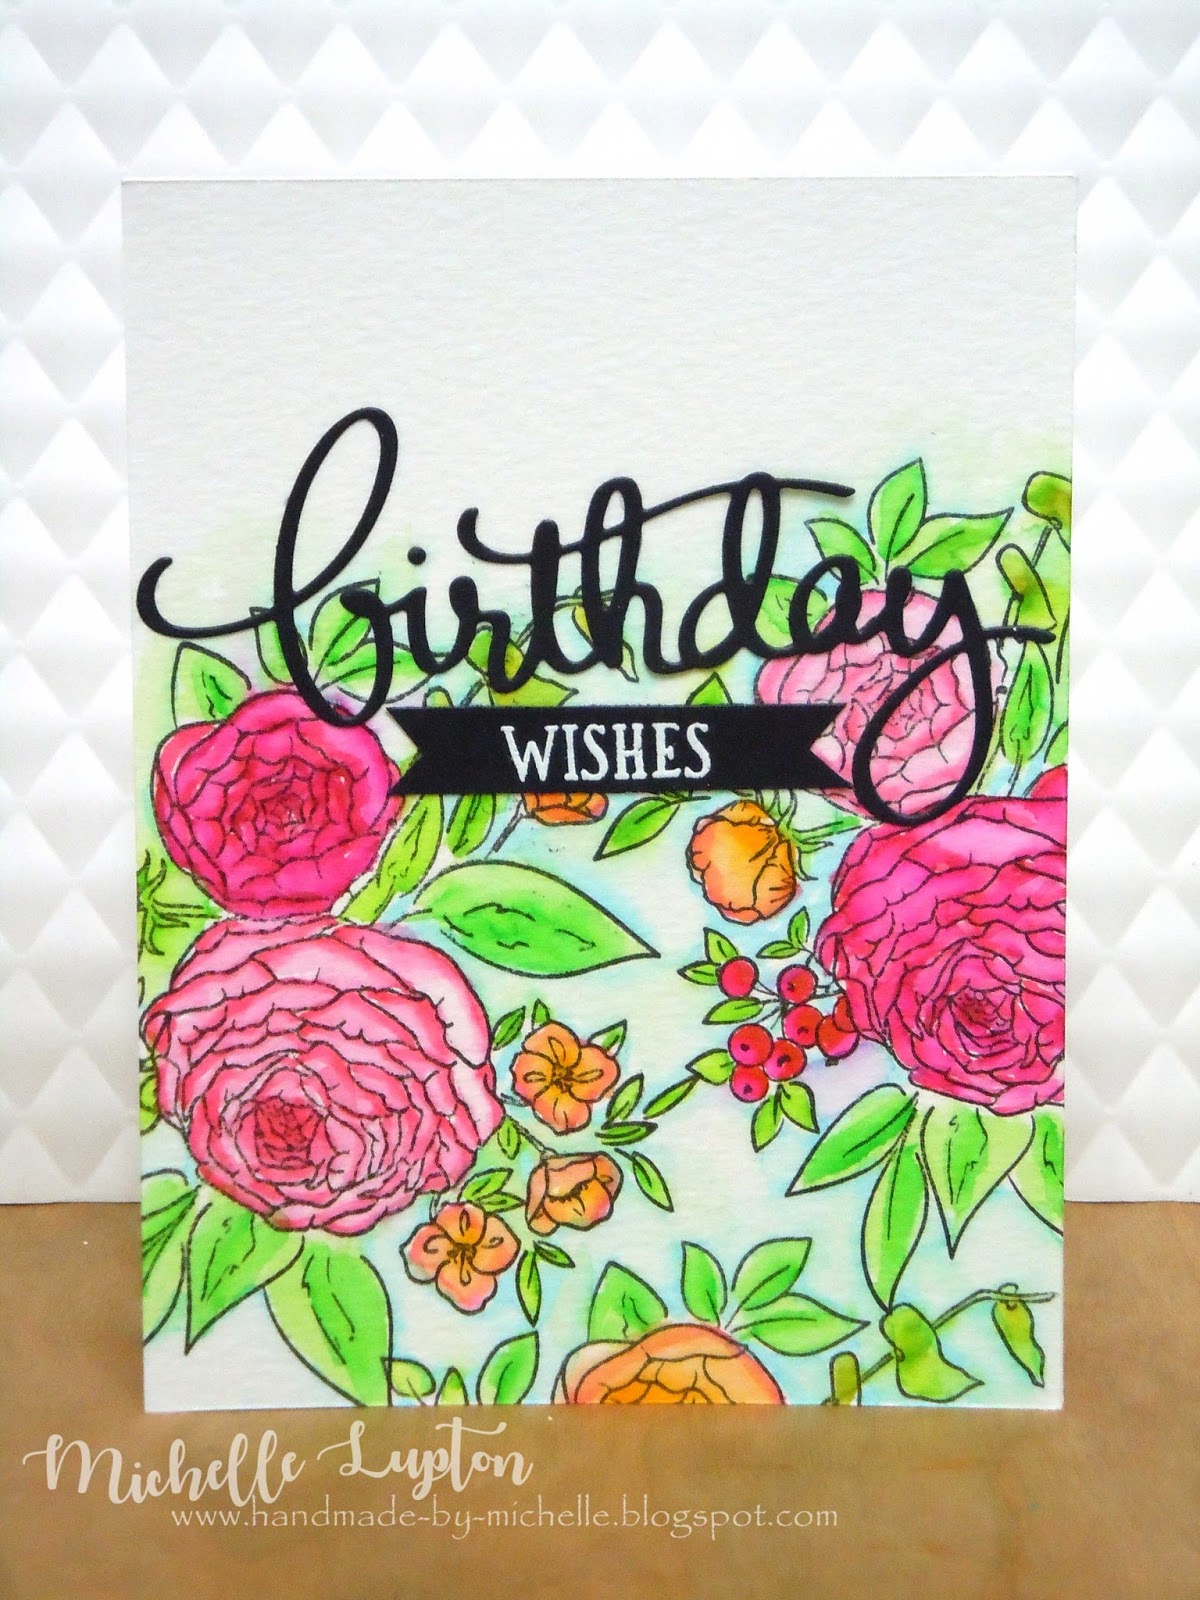
I started by using the Serendipity Stamps "Heart Scroll Die" onto some watercolour cardstock that I had coloured with some red and pink Distress Inks and water. I also cut out another heart using white cardstock.  I took the negative space of the coloured piece, and stuck it to a card front on an angle. I placed the white die-cut piece inside the negative space, and then put little dots of liquid adhesive on each of the little holes. I then put the pink/red diecut heart over the top (this one still had all of the little pieces still in place) and lined it up so all I had to do was use my tweezers to poke the little pieces out of the red heart down into the spaces in the white heart. I finished the card with a stamped sentiment from Hero Arts, and a line of white gel pen faux stitching around the edge of the panel.


 With the red heart I had left, I put that into the negative space left from cutting out the white heart (after diecutting the white panel with a stitched rectangle die from Lil Inkers), and put some Stampin Up glimmer paper behind it.  I  Took a Hero Arts mid toned blush card and stamped the "Elaborate" cling stamp from Penny black in Versamark, and clear heat embossed it. I added a sentiment die cut from the Avery Elle "Sentimental Die" set, cut from Stampin' Up Basic Grey cardstock, with Wink of Stella and then Glossy Accents added for shimmer and shine. I finished with a few sequins from Pretty Pink Posh. 
I'll be sharing my first card at Muse challenge - here's Tracey McNeely's inspiration:
http://musecardclub.blogspot.com.au/2017/01/muse-challenge-199.html
I'll also be sharing at CASology, whose theme is "Cut"

http://casology.blogspot.com.au/2017/01/week-232-cut.html

Thanks for visiting :)

Sunday 15 January 2017

Pink and gold

Hello again! I've had some time to get crafty the past few days, so I've been busy getting to know my new Zig markers. I am so happy with them!  I'm also trying to build up my stash of birthday cards - my box is getting a bit light!
I used the Wplus9 set "Beautiful Bouquets Dahlias", stamped multiple times in Hero Arts intense black ink and coloured with pink, pale green and pale grey Zig clean color real brush markers. The sentiment from Gina K designs was stamped in Versamark on vellum and heat embossed in gold.
 I'm playing along with two challenges with this card - CAS Colours & Sketches #205, and CASual Fridays "Everything turns to Gold"
http://cascoloursandsketches.blogspot.com.au/2017/01/challenge-205-sketch.htmlhttp://cas-ualfridays.blogspot.com.au/2017/01/cfc165-everything-turns-to-gold.html

 Thanks for visiting :)

CAS(e) this sketch #204

I made this quick card this morning to play along with this week's CAS(e) this sketch challenge.
I used a flower image from Altenew's "Botanical Garden" set, with a Reverse Confetti sentiment from "You're So" and the matching die set. I stamped the flower in Hero Arts Wet Cement ink, and then coloured over it with Copic markers.  Yes, I know, Hero Arts Shadow Inks are not Copic fast, but I wanted the flower image to look a little bit like it was in soft focus, not sharp, so that the sentiment would stand out on top.
http://casethissketch.blogspot.com.au/2017/01/case-this-sketch-204.html
Thanks for visiting :)

Saturday 14 January 2017

Thanks so very much

Getting to know my Zig clean color real brush markers on different cardstocks - this is on Canson watercolour cardstock, 300gsm.
I did my usual technique of white heat embossing the image (from Wplus9), adding colour then spraying with water to spread the colour.  However, this resulted in some of the colour spraying all over the place in little specks, so I finished by adding water more carefully with my Aquash pen. I finished the panel with a sentiment from Reverse Confetti (love the mixture of fonts). I mounted the panel onto a mid-blue notecard from Hero Arts, and added a thin strip of glimmer paper from Stampin Up.

Thanks for visiting :)

Thursday 12 January 2017

CASe this sketch

This card came about because of three reasons. One - I wanted to join in with the latest CAS(e) this sketch challenge.  Two - I recently bought some Zig clean colour real brush markers, and I wanted to test them out on some different types of cardstock (I used Stampin' Up heavy weight whisper white for this card). Three - I saw THIS VIDEO from Kelly Latevola this morning, and I was inspired by her colouring (as I always am!) In my dreams, I can colour in images like Kelly can :) 


http://casethissketch.blogspot.com.au/2017/01/case-this-sketch-203.html
Thanks for visiting :)

Wednesday 11 January 2017

Happy birthday, Claudine

Today is my sister-in-law's birthday. My niece told me that her favourite colours are purple and royal blue, so I made this card for her.
I used the "You're so" set from Reverse Confetti to stamp the sentiment in Versamark, then heat emboss with some silver embossing powder. I then masked off the sentiment, and added the Tim Holtz / Stamper's Anonymous "Lace" stencil, and blended some Worn Lipstick, Shaded Lilac and Blueprint Sketch Distress Inks over the top.
 I faded the ink off underneath the sentiment to match the sketch from CAS Colours and Sketches challenge.
http://cascoloursandsketches.blogspot.com.au/2017/01/challenge-205-sketch.html
I'll also be sharing this card at Less is More for their "Ombre" challenge. 

Thanks for visiting :)

Tuesday 10 January 2017

Love you

I have a card over at A Blog Named Hero today, using stamps from Right at Home and Hero Arts - here's a sneak peek:
Thanks for visiting :)
Supplies: