Time for another challenge at Fusion!
I used both the photo and the sketch this week, to create this fusion (I just put the sentiment below the dots instead of above!):
The red polka dot circles are covered in washi tape. The musical circles have been stamped with Hero Arts Music Background. The heart is punched with a Stampin' Up punch, in their red Glimmer Paper. I then trimmed a couple of mm off the edge, and layered it on some shiny paper (this is from a gift bag a friend gave me (thanks Janet!) from Happy Lab - it was originally gold, but I coloured it red with a Copic Marker.) The sentiment is from PaperTrey Ink.
Make sure you visit Fusion and join in on the fun! Thanks for visiting :)
Friday, 31 January 2014
Tuesday, 28 January 2014
Homemade stencil
I made a stencil from a sheet of acetate and my favourite butterfly dies from Hero Arts and Sizzix. I used my blending tool to add Distress Inks to the butterflies, and then stamped over with the Flower Dot Pattern stamp from Hero Arts and Basic Grey. Some sequins and a sentiment from Stamp-It, and I was done.
Thanks for visiting :)
Thanks for visiting :)
Water birds
On my travels through blogland today, I came across THIS CARD by Ingrid at The Creative Grove. It reminded me of the card below that I actually made in December, and forgot to post!!
I actually like Ingrid's card better - I might have to have a go at creating a horizon like she did. Very cool.
Thanks for visiting :)
I actually like Ingrid's card better - I might have to have a go at creating a horizon like she did. Very cool.
Thanks for visiting :)
Monday, 27 January 2014
Snow stencil, but not on a snowy card!
I thought I'd try using my Simon Says Stamp falling snow stencil today, but not over an entire card. I put the texture paste on the stencil first thing this morning, took the stencil off, left it to dry, and then when I came back to it early this afternoon, I had NO IDEA what to do with it! I cut a square panel of card to be the focal point, but coun't figure out what to put on it! I tried leaves, I tried a monster, I tried flowers, then I gave up. Just came back to it after dinner, and as soon as I decided to try a Valentine's Day card, it just came together :) Yay!
I'll be submitting this card to Just Us Girls #225, and to CAS on Sunday's Lovely Dovey challenge.
I'm wondering if anyone else out there uses Martha Stewart Crafts texture paste with their stencils? I have some VERY old texture paste from Jo Sonja, but it smells quite strongly of paint, and the smell doesn't completely fade when it dries, so I bought the Martha Stewart Crafts White Texture Effect paste. When I first opened it, it looked almost like a foam - very odd consistency. But when it goes on, it is quite grainy, which means that when I try to use it on a stencil with larger open spaces, I get these streaks and scratches where the grains have dragged across the surface.
I haven't seen the Wendy Vecchi paste in any shops here in Australia - I might just have to wait until my next internet order, which will probably be months away. Oh, well. It works OK with stencils that have quite small open spaces, so I'll have to stick to them.
Thanks for visiting :)
Happy birthday, Amy :)
This card is a direct CASE of a card I was given by Linda Trace, so I can take no credit! (I tried to find her card on her blog, but I can't find it - but I got to do through 2 years of blog posts, so I had fun, anyway!) Her card was a thank you card, but I adapted to make it a birthday card for Miss Amy :)
Thanks for visiting!
Thanks for visiting!
Sunday, 26 January 2014
Stencils and pencils
This is my third post for today - for my Retro Sketches card, please click HERE.
Another card using a technique of Kristina Werner's from Online Card Classes.
Yes, I photographed this card immediately after adding Glossy Accents to the balloons - can you see the big drip happening on the red balloon? Yes? Well, I fixed it, so it's all OK ;)
Thanks for visiting, and Happy Australia Day! Here's a pic of my nails for the occasion!
Watercolour with a stencil
This is my second post for today - for my Retro Sketches card, please click HERE.
Trying to combine ideas from two of the Online Card Class teachers in this card - using watercolours with a stencil (and enbracing the imperfections!) like Laura Bassen, and stamping over a stencil like Kristina Werner.
I watercoloured over the KaiserCraft "Leaves" template with Distress Inks in Salty Ocean, Mowed Lawn and Peacock Feathers. I then stamped over it with Hero Arts/Basic Grey "Flower Dot Pattern) in Salty Ocean and Peacock Feathers, removed the stencil and stamped a sentiment from Avery Elle's "Oh Happy Day" (does anyone else wish that that stamp set had the sentiment "Happy Birthday" in the same font!?? LOVE the font, and I would use Happy Birthday over and over and over!!)
P.S. I had some Distress inks left on my craft mat, so I smooshed some watercolour paper into it and made another card. It was one of those cards that didn't quite work, and instead of binning it and starting afresh, I just kept on and on, adding and adding, and ended up with a train wreck of a card. Very dark, too many layers, just too much of everything. Wrong, wrong wrong. *sigh* Oh well!!
Retro Sketches #99
I've been very lucky to be a guest with Retro Sketches throughout December and January - thanks so much to Arielle, Laurie and Kasia for giving me the opportunity to join them for the last 7 sketches!
The sketch below is based on a card I made (you can see it HERE).
The "hello" sentiment is from Papertrey Ink, and the heart stamp is from Neat and Tangled. The patterned paper is from Basic Grey "kneehighs" 6x6 paper pad.
Thanks for visiting, and make sure you visit Retro Sketches and join in!
The sketch below is based on a card I made (you can see it HERE).
The "hello" sentiment is from Papertrey Ink, and the heart stamp is from Neat and Tangled. The patterned paper is from Basic Grey "kneehighs" 6x6 paper pad.
Thanks for visiting, and make sure you visit Retro Sketches and join in!
Saturday, 25 January 2014
Stencil and emboss resist
I thought I'd try using a stencil with Versamark ink to create an emboss resist pattern, like Laura Bassen did in today's Online Card class. I also had pink and orange on the brain after seeing Mary Dawn Quirindongo's lovely card today.
I used Picked Raspberry and Spiced Marmalade Distress Inks so that I could splatter some water on the card to make the inks move. Finished with a sentiment from Avery Elle and some faux stitching lines.
Thanks for visiting :)
I used Picked Raspberry and Spiced Marmalade Distress Inks so that I could splatter some water on the card to make the inks move. Finished with a sentiment from Avery Elle and some faux stitching lines.
Thanks for visiting :)
Another stencil, another card
I bought three new stencils today - this one is much smaller than the 12x12 one I used in my last card, but it is still too big to fully fit onto a card front, so I just put it over the edge.
I used little sponge daubers for this card - and sponged Distress Inks in Brushed Corduroy, Squeezed Lemonade, Dried Marigold, Mowed Lawn and Barn Door. I popped the sentiment from Amuse Art Stamps up on dimensional adhesive on a white banner (I ran a brown marker around the edge to give it a bit of definition).
Thanks for visiting :)
Online Card Class: Stenciled Day 1
Another Online Card Class began today - didn't get much done this morning, as I was not feeling crash hot, but managed to get myself to Spotlight to buy 3 new stencils from Kaiser Craft. I don't own many stencils, and the ones that I do have are quite geometric, and I was not in a geometric mood, so wanted something more organic - know what I mean? Anyway, here's my first card:
I used the 12x12 template from Kaiser Craft called "leaves" for this one - used my ink blending tool with 2 distress inks - Spun Sugar first, then moved the stencil and added some Worn Lipstick. Finished with "Happy Birthday" from Stamp It in Hero Hues black ink. I decided it needed a teeny bit more oomph, so I painted over the Worn Lipstick with my clear Wink of Stella brush. You can just make it out in the next photo.
Back soon with another stenciled card :) Thanks for visiting!
Monday, 20 January 2014
Tiny Flags for ABNH
Check out my post today at A Blog Named Hero - here's a sneak peek ;)
Make sure you visit A Blog Named Hero to join in with the latest challenge! There's a voucher from Simon Says Stamp to be won!!
Make sure you visit A Blog Named Hero to join in with the latest challenge! There's a voucher from Simon Says Stamp to be won!!
A flippy card for Just Add Ink
I was given the Circle Card Thinlit die set, and the envelope punch board from Stampin Up for a late Christmas present (thanks, Mum!), and I just saw Just Add Ink's challenge this week was to make a flippy card or to use the envelope punch board! They obviously saw what was in my Christmas stocking!
I used my new "thin stripes" stamp from Cover A Card with a bunch of Hero Arts Shadow inks. The sentiment is from Stampin' Up "teeny tiny sentiments".
Here's the flip side ;) I left the circle free to write a message there. I was planning on doing little black stitching lines around the rainbow stripe panels (like the sentiment banner), but I resisted the urge, and I'm glad I did! But I'm glad I added a 2nd heart on the inside, and I'm very glad I added some Wink of Stella shimmer to the hearts :)
Thanks for visiting :)
Sunday, 19 January 2014
Retro Sketches time!
It's time for another Retro Sketches card - I'm playing along with Arielle, Kasia and Laurie and as a guest designer during January - here's my card, based on a sketch from a card by Laurie.
I used some absolutely beautiful Japanese paper on this card - I left the rest very simple to let the paper take centre stage. The sentiment is one of my very first stamp purchases - it's VERY old - from Artee Stamps - I thought the calligraphic font went well with the Japanese paper.
Come on over to Retro Sketches to check out what the other design team members came up with, and join in on the fun!
Thanks for visiting :)
Saturday, 18 January 2014
Butterfies and die cuts
Addicted to CAS has a Die Cut challenge this week. I wanted to see if I could use die cuts 3 ways - as a mask, as a sentiment and as a traditional die cut image.
I used a Stampin' Up butterfly die as a negative mask to sponge and stamp over the larger butterfly, then cut out the smaller butterfly with a Simon Says Stamp die, and stamped it with the same Hero Arts/Basic Grey flower dot background stamp.
The sentiment is a mish mash of a PTI die cut, the word "happy" from a Hero Arts clear set, and, "to you" from a HA woodblock stamp (I had to use my stamp positioner for that, as the stamp actually says, "it's just like you to be so nice").
I finished with a pearl that I coloured in black, and some Sakura Jelly Roll glitter pen on the butterfly and the "birthday" die cut.
I made this card using a sketch from CAS(E) this sketch (the one with the 2 feathers), but my internet access went belly up during our heat wave this week, so I missed the submission date. :(
Thanks for visiting :)
Friday, 17 January 2014
A snowman for Merry Monday
This is my 2nd post for today - for my Fusion post, please click HERE.
I'm determined to make a stash of Christmas cards throughout the year this year, and Merry Monday is going to help me do it!!
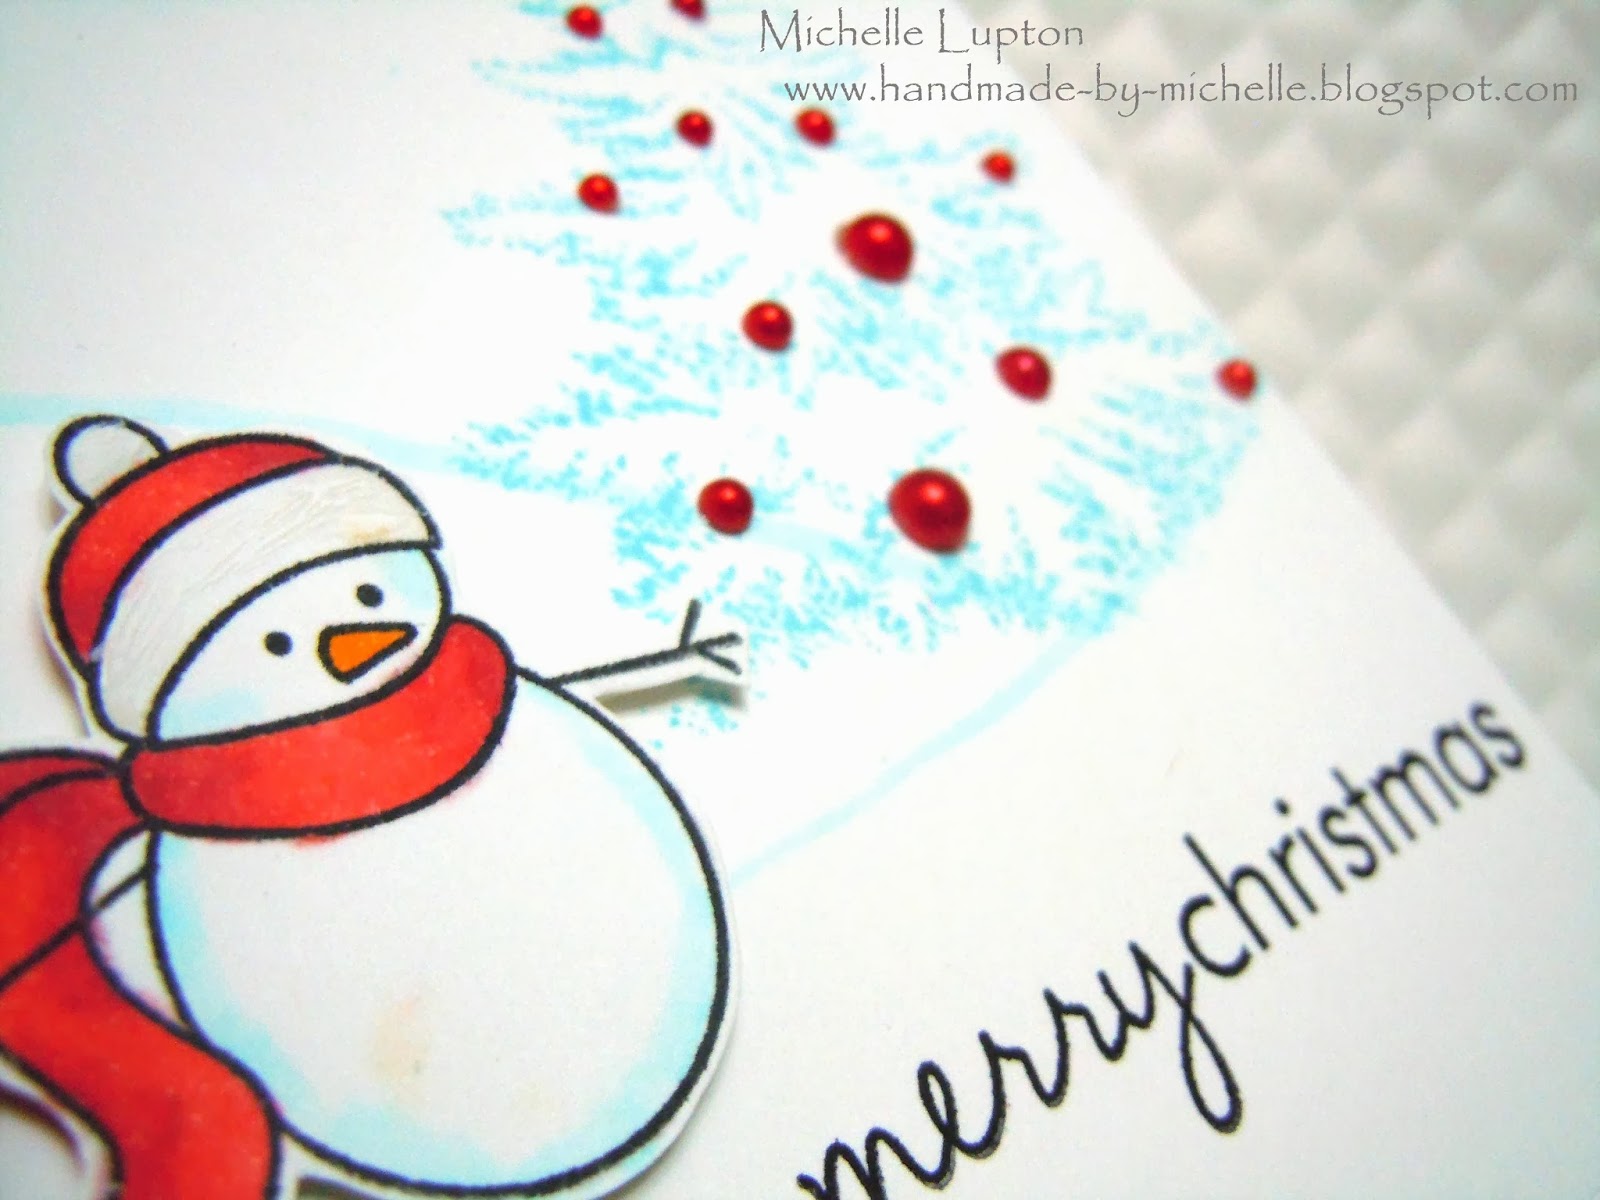
The challenge at Merry Monday this week is to use a snowman - this one is from PaperTrey Ink, as is the sentiment. The tree is from Hero Arts.
Just looking at this card makes me yearn for cold weather even more - Melbourne is in its longest, hottest heat wave on record - 4th day in a row above 41 degrees (that's Celcius), and my car told me that it was 45 (that's 113 Farenheit) whilst driving home from work today. Ugh. We're looking out for a cool change tonight, and it won't come soon enough!!
Thanks for visiting :)
Fusion #2
Hi, all - there's a new challenge out at Fusion card challenge today - check it out!
This is what I did, based on the photo inspiration:
I hope you can see in the photo, but I used a PTI woodgrain impression plate for the background. I then inked with Antique Linen Distress ink. The sentiment and banner are both from Simon Says Stamp. Two of the flowers are from Creative Memories, and the musical flower was made from sheet music and given to me by my dear friend, Stella - thanks, Stel!! The black buttons are Basic Grey.
Make sure you visit the Fusion blog and join in on the challenge!
Subscribe to:
Comments (Atom)


